
Making sprite sheets with ImageMagick
Published by James on 19/02/2025As one half of a very small team, working with Godot to develop a 2D metroidvania video game, one task which frequently falls to me is that of creating sprite sheets. Although Adobe Animate has a useful ‘generate sprite sheet’ facility, which I do often use, not all our animations are produced with it, and there are times when I’m simply handed a folder full of animation frames and tasked with turning them into a sprite sheet manually.
It sounds easy, but in practice, I used to find the process of compiling sprite sheets both time-consuming and tricky – at least with Adobe Photoshop. It offers a customisable grid; that helps a bit when your frames are square, and you can use the snapping feature to line up your frames, but it’s not very useful when they’re rectangular. Another problem I was having with Photoshop is that the transparent parts of a sprite are ignored when copying and pasting it, so that didn’t help with laying out composites either.
For a while, I would draw little ‘corners’ onto every frame, so that they’d at least hold their shape when copying and pasting them into my sprite sheets. However, even with Photoshop’s batch editing tools, which enable you to do something once, to one file, and then automate it for the rest, I still found this really clunky and annoying. (And it still didn’t help much with non-square animations.)
Enter ImageMagick!
In this short tutorial, I’m going to explain my new process for compositing sprite sheets with ImageMagick – the self-described ‘free, open-source software suite, used for editing and manipulating digital images’ which, I’m happy to say, takes all the effort out of compositing sprite sheets for your 2D video game.
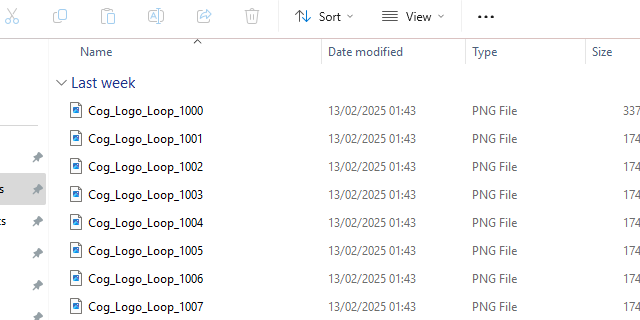
Step 1: Create your frames
Firstly, you need to create your animation frames in the usual way.
Save them to a single folder, and name them sequentially according to the order in which you need them to play – for example, 001.png, 002.png, and so on.
When you’re done saving and naming your files, you’ll want your folder to end up looking something like this:
Step 2: Install ImageMagick
Now’s the time to get ImageMagick, if you don’t already have it installed.
You can download it from the ImageMagick website.
Assuming you’re using Windows or Linux, I recommend downloading the executable file. This is the easiest way to get up and running with ImageMagick. (You can use it if you’re on a Mac device too, but I’m afraid you’ll need to follow the instructions on the website for that as I don’t have a Mac myself!)
Step 3: Open your command line
Now that you’ve installed ImageMagick, it’s time to make some of that ‘digital image alchemy’!
ImageMagick doesn’t provide a graphical user interface (GUI), so you’ll need to use your command line for this, but don’t worry – running the prompts you need to generate your sprite sheets couldn’t be easier. Assuming you’re running Windows, you can open your command line in one of two ways:
- Recommended: Right-click the folder containing your frames, and select ‘Open in Terminal’.
- Open your start menu, and search for ‘Windows PowerShell’.
The former approach may be slightly easier, as you won’t need to manually navigate to the folder containing your frames. If you do choose the latter option, you’ll start in your root directory for your Windows user, and you’ll need to use the ‘CD’ (change directory) command to reach the folder containing your frames manually.
Once you’re in the proper place, it’s time to enter your ImageMagick command.
Step 4: Write your prompt
The image below demonstrates what my own prompt looks like.
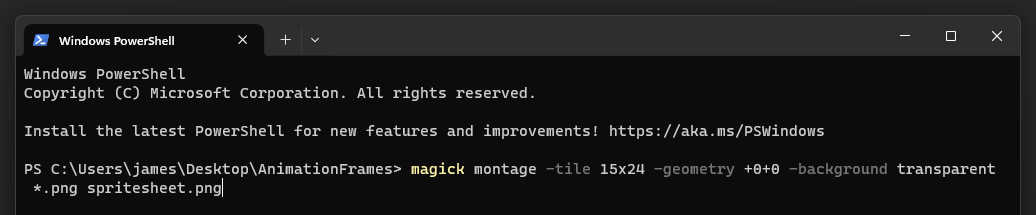
You’ll need to customise this prompt to achieve your goals, so let’s break it down:
magick
All ImageMagick commands start with ‘magick’, so write this first.
montage
By invoking the ‘montage’ program, we’re telling ImageMagick that we want to create a montage of images, taking a series of existing images and compositing them into a single, new image.
-tile 15x24
The ‘-tile’ parameter tells ImageMagick how we want to lay out our frames. In this example, I’m requesting that it creates 15 columns and 24 rows, but you can change these numbers to suit your needs. For instance, if you want a sprite sheet that is eight columns by four rows, you could enter ‘-tile 8x4’ here.
-geometry +0+0
The ‘-geometry’ parameter tells ImageMagick where to place the frames. If you wanted to create some ‘padding’ between your frames, you could do that here. In my case, I don’t want any empty padding between my frames, so I’m using the argument +0+0 to ensure there is none on either axis.
-background transparent
The ‘-background’ parameter tells ImageMagick what to do with the sprite sheet’s background. You probably want your frame backgrounds to be transparent, if that’s how you’ve designed them, so make sure you pass this into the prompt. (If you leave this part out, ImageMagick will generate your sprite sheet with a solid white background.)
*.png
In this part of the command, we’re entering ‘*.png’ to instruct ImageMagick to use all the images in the folder that are of type PNG. The asterisk is a wildcard selector, ensuring that all files ending with the .png extension are included in the composition. If you wanted to filter your files to include only files of a certain name format or type, you could do that here.
spritesheet.png
Finally, we need to tell ImageMagick what to do with the output. In this case, I’m happy for ImageMagick simply to place the output sprite sheet in the same folder where all the frames are kept, so I can simply enter ‘spritesheet.png’. This will mean that a file called ‘spritesheet.png’ will be created in my frames folder.
Once you’ve made your changes, string it all back together, like so…
magick montage -tile 15x24 -geometry +0+0 -background transparent *.png spritesheet.png
… and hit enter!
With your work done, ImageMagick will now do its part. This can take a few moments, depending on the number of frames you’ve given it to work with, but eventually you should see the newly-created sprite sheet in your folder, masterfully composited, ready to be dropped into your game’s assets directory.
And that, all being well, is a job done: one which might otherwise have been terribly time-consuming and frustrating, now reduced to a few simple, easy steps thanks to the magic of ImageMagick. For me, certainly, and for my own indie video game, it’s been a huge time saver.
If you’re a game developer like me, then I really hope that you found this short introductory tutorial, and ImageMagick itself, useful. It’s a great tool, and there’s so much more you can do with it besides compositing sprite sheets. Make sure you check out the official documentation, and consider supporting the project’s development.
Until next time!
Latest posts

It’s often remarked that January feels like the longest month, and it definitely has felt like it this year. Was New Year really only a month ago? Still, if we’re a full month now into 2026, then that makes it time for another monthly update on all things Star Heretic and Cult of Galaxy!

It’s that time of the month again, and it’s also that time of the year, which means it’s time for another monthly, and also yearly, update. 2025 has been yet another really big year for us, and 2026 looks set to be even bigger as we continue to work towards sharing with you our next demo!
It’s December tomorrow, which means it’s time for yet another monthly update on all things Star Heretic. Without further ado, let’s get into what Chel and I have been up to over the past thirty days…